Guide to Checking Transcriptions
Contents
Introduction
This page includes aspects to keep in mind if you have been tasked with checking another transcriber’s ELAN transcription.
Remember that as a checker of the transcription, you are acting as the 2nd transcriber, listen to the entire file as if you are transcribing from start to end.
With regards to the Talk Together Study (TTS), if you need to make edits to a file that you are checking, please “Save As” a new file and follow the respective file naming conventions for the transcription checker as outlined on the TTS ELAN File Naming Conventions page of the wiki.
Checker/Transcriber 2 (Column N) and Date Issued (Column O) of the transcription log will be completed by the person on the Audio Processing team who passes you the file to check. For the columns that you have to complete as a checker, please see point number 12 in the step-by-step checking procedure below. As a checker, you should note any major changes (e.g., adding tiers, adding missing annotations, etc.) you make to the file in the Comments by checker (Column Q).
Back to table of contents
Step-by-step checking procedure
Don’t forget to watch/listen to the media file in full before you begin the checking process.
Ensure you also adjust the vertical zoom (right click on the waveform > Vertical Zoom > adjust the %) and horizontal zoom (adjust the slider at the bottom right of the ELAN screen) to help you see the waveform more clearly in ELAN.
In order to see the hierarchical relationship between the dependent tiers, right click on the tier sidebar > Sort Tiers > Sort by Hierarchy.
1. Check that they have followed the file naming convention(s)
Refer to the relevant page on the wiki depending on which project’s data you are working on. Ensure that the transcriber ID is used instead of the transcriber initials. If initials are used, you should replace it in the filename.
2. Check that they have used the newest ELAN transcription template.
All Interjection tags in the language tiers should be Languageless. If a retired version of template is used, import the new template BLIP_Languageless_Guide_20210920.docx according to the step-by-step instructions sent out on 20th Sept 2021. After that, replace all mentions of Interjection tags to Languageless using the Find and Replace function. It should be noted that when importing the new template, the tier attributes will be reset. For example, P12345TT will be reset to PxxxxTT and the annotator fields will be empty. Fill in the relevant fields again.
3. Check that they have edited the placeholder IDs in the tier attributes to reflect the participant’s actual study ID
Any placeholder Participant IDs in Tier Attributes should be edited with the actual participant study ID for all the primary and secondary tiers of the speakers present in the recording. The placeholder IDs should be replaced even if the tier is not utilised. For example, if the ID is P1234TT and Mother and Baby are present, the placeholder IDs PxxxxTT should be replaced to reflect P1234TT for all the Mother and Baby primary and secondary tiers. The participant tiers include: Utterance, Chunk, Language, Target_EL, Target_ML, Target_CL, Target_TL, Matrix, Translation, and Sensitive_Masking.
Change any Transcriber Initials to Transcriber ID for Tier Attributes and comments.
4. Check for all the errors mentioned in this video
- Misalignments i.e. spoken word was not fully captured in annotation
- Typos
- Mistranscriptions i.e. what was annotated did not correspond to the recording
- Missing annotations
5. Check that chunks have been tagged with the appropriate language tag
e.g., a Mandarin chunk should not be tagged as English or Vocal Sound. When encountered with the #!#?, listen to the utterance and resolve it accordingly.
When checking for unknown language tags in the transcription file (#!#?), it is possible to find that the parent is speaking in a language that is outside of the language list.
If you are able to confidently identify the language the parent is speaking, identify its corresponding ISO 639-2 language code here.
After which, use the following format to tag such segments:
:v:l:iso639_2_{iso 639-2 language code}
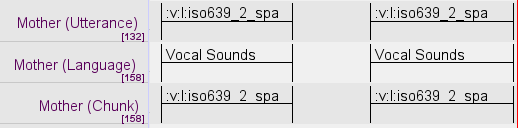
Example one: tagging Spanish segments in a transcription file. The ISO 639-2 code for Spanish is spa. Thus, Spanish segments would be tagged as follows:
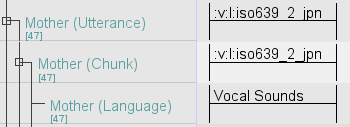
Example two: tagging Japanese segments in a transcription file. The ISO 639-2 code for Japanese is jpn. Thus, a Japanese segment would be tagged as follows:
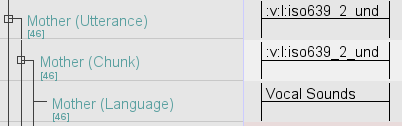
If you are unable to identify the language, do flag it to the team. When we know the parent is speaking another language as indicated in their profile (e.g., README file) but we are not confident to identify the language, we assume the language to be undetermined. The ISO 639-2 code for undetermined language is und. Thus, such segments would be tagged with :v:l:iso639_2_und as seen in the example below:
6. Check that there are no typos/unecessary spaces in the Utterance/Chunk tiers
Keep an eye out for any occurrence of a typo.
Generally, annotations should not have unecessary spaces. The exception to this is for Chinese transcripts.
For Chinese transcripts:
- Spaces should be added in between Chinese words in the Chunk tier but not the Utterance tier. Questions regarding this have been answered in the Frequently Asked Questions by our Research Associate Woon Fei Ting.
- For the Utterance tier, spaces should be placed to separate Chinese characters from text that aren’t Chinese characters. e.g., “she eats 那个 uh 汉堡包 :v:laughter” should be written in the Utterance tier as
she eats 那个 uh 大大的汉堡包 :v:laughterand NOT asshe eats那个uh大大的汉堡包:v:laughterThe exception to this rule is question marks e.g.orangutan is sad 对不对?.
7. Check for loanwords and bound morphemes.
When checking the transcription, look out for possible loanwords and bound morphemes. Mark them with the specific conventions outlined here and here.
Check out the Frequently Asked Questions for non-English morphemes and English words.
8. Check that the activity markers have been placed appropriately
Please refer to the Transcribing Talk Together Study Tasks page on the wiki for guidance on where to add activity marker tiers when transcribing Talk Together Study recordings.
9. Check that there are no unecessary empty cells or missing annotations
There should always be annotations on the Utterance, Chunk, and Language tier. There should also be annotations on the corresponding Translation and Sensitive_Masking tier if applicable.
10. Check that there are no unecessarily long cells
This point circles back to referencing Shamala’s “A problem named Utterance” document here to make sure what has been annotated is a proper utterance.
11. Check that all timestamps are positive
This is an unusual and uncommon occurrence, but we have had instances in the past where chunks have had negative timestamps.
12. Check that all instances of redactable information has been isolated and annotated on the Sensitive_Masking tier
Please see the tier guide for more information on the Sensitive_Masking tier. Any mention of the baby’s name must ALWAYS be redacted with the corresponding redaction code.
Live demo on how to use the Sensitive_Masking tier here.
For transcripts completed before March 12 2021, ensure that the “Sensitive_Masking” tier has been added:
As per protocol change on March 12 2021, all transcripts should have a Sensitive_Masking tier. Transcripts that were being worked on prior to this date may not have this tier and the corresponding annotations that isolate and redact instances that should remain confidential (e.g., mention of the baby’s name or confidential conversations). Follow these steps to add the Sensitive_Masking tier:
- With the .eaf open, go to ‘Edit’ > ‘Edit Controlled Vocabularies’
- The external Controlled Vocabulary Window should pop up.
- Click ‘External CV’ and ‘Browse’ to import the Sensitive_Masking controlled vocabulary (
BLIP_TTS_sensitive_masking_controlledvocab_20210315.ecvwhich can be found in the same Onedrive folder as the ELAN template) - Close the Controlled Vocabulary Window once the Sensitive_Masking CV has been imported succesfully (i.e., it appears in the window)
- In the toolbar, go to ‘Type’ > ‘Add New Tier Type’.
- Enter
Sensitive_Masking_IncInin the Type Name - Select
Included inas the Sterotype in the dropdown menu - Select
Sensitive_Maskingas the Controlled Vocabulary in the dropdown menu - Click add. You have now created the
Sensitive_Masking_IncIntier type. - Create the
Sensitive_Maskingtier for each of the participants in the template (Baby, Mother, Father, Resercher).
13. Upload the .eaf file into the BELA dashboard to see if you missed out anything during the checking process (don’t worry, it happens!)
When you enter the BELA dashboard once the .eaf has been uploaded:
- Under the ‘Lexicon’ section (hit
Toggleto reveal), clickHighlight Unknown Words, then click theLexicon Tab. - Check all sub-tabs in the lexicon tab for words highlighted in red (e.g., typos), or words that should be tagged differently (e.g., an English word that was tagged as Malay). You may also get some highlighted in red that are not actually errors (e.g., Proper names, “mama”, etc.) Use your best judgement on whether or not it should be corrected. If you are unsure, ask someone on the Audio Processing team.
- Under the
Full Transcriptsection (hitToggleto reveal), check the checkbox forShow Errors Only. This will isolate any errors that need fixing (e.g., a chunk missing a language tag). - Fix the errors highlighted by the BELA dashboard
- Re-upload the transcript again to ensure no more errors are present.
- Repeat the steps if necessary.
14. Update the transcription log
Update the transcription log during and after completing the checking process. Columns of the transcription log that should be filled by the checker include: Completion (Column P), Comments by checker (Column Q), and Transcribed filename (Column R). Inform your supervisor that you have completed the checking process.
Checker/Transcriber 2 (Column N) and Date Issued (Column O) of the transcription log will be completed by the person on the Audio Processing team who passes you the file to check.
For more information about the Transcription log, please refer to this page of the wiki.
Back to table of contents
Helpful keyboard shortcuts
Here are a few keyboard shortcuts that can be useful during the checking process.
| Description | Shortcut Key and Notes |
|---|---|
| Create a new annotation cell | alt + N or ctrl + alt + N (Windows) or option + N (Mac) |
| Modify annotatiion cell time | With a selected cell (it’ll be blue if it’s selected) > click and drag to desired timepoints so that the area is highlighted > ctrl + enter (Windows) or command + enter (Mac) |
| Play/pause media file | shift + space |
| Play a selected cell | shift + space |
| Move to previous cell | alt + left arrow key |
| Move to next cell | alt + right arrow key |
Moving to a previous/next cell is especially useful for checking individual cells. Checking each individual cell helps to ensure that the speech is fully encapsulated within the cell that corresponds to a transcriber’s annotation (i.e., to avoid misalignnment errors).
Back to table of contents
Have questions? Please feel free to approach someone on the Audio Processing Team.